I also made this wreath a couple years ago and it is still on my door. I guess I should probably bust out a new one. I just love it so much. I made one for my mom that is yellow and cream. This was much easier then the shower curtain but still time consuming. I found the idea at the same website, design sponge.
Tuesday, May 29, 2012
Past Projects
I posted these projects a while ago on my personal blog and thought I would put them up here too. I was inspired to make this shower curtain by a pattern on design sponge. It took me a few weeks to gather all the fabric I wanted to use since I had to wait for my coupons and buy a couple different prints. The picture is a little bit blurry but it really changed the whole look of my bathroom. Talk about a face lift.
Monday, May 28, 2012
Boy Blanket
This is the blanket I made for our baby boy. I wanted it to be boyish, but not babyish. The top is cotton and the backing is flannel. Sewing projects always cause muffled curses and sometimes tears for me but I am usually very satisfied with the outcome. I am sure one day it will be covered in spit-up and slobber, but for now it is a prized possession.
B&A-Sewing Cabinet #2
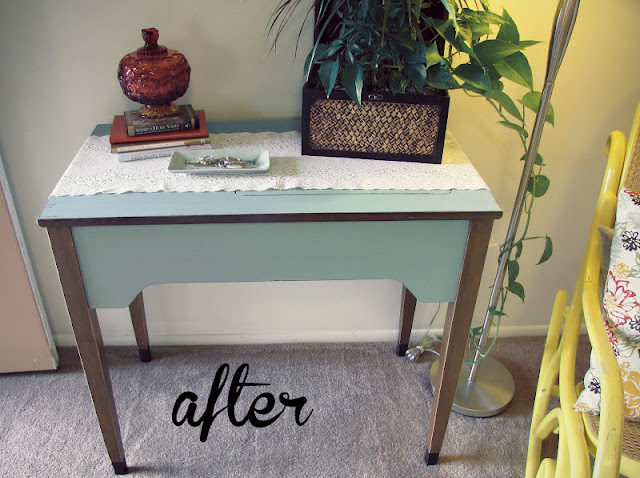
This sewing cabinet was my mom's but there is no sewing machine in it now. We have used it as an entry table for about 4 years now. I have always wanted to paint it for obvious reasons. The sides and top are veneer while the legs are wood. This project actually ended up being so simple. I can't believe it took me so long to do it. It literally was done within a few hours and I really like how it turned out.
My friend McKaye told me about a blog with tips on how to refinish furniture on the cheap. There is a recipe on there for chalk paint (not to be confused with chalkboard paint). If you have some furniture to refinish I highly recommend checking it out. It has changed my life. It is so inexpensive and makes painting furniture much more enjoyable.
Definitely needs some work
I bought a Valspar paint sample (8 oz.) for $2.94 at Lowes and I had more then enough paint left over for a couple little projects. I used Lyndhurst Duchess Blue because it matches my pillows perfectly.
I distressed the top and sides slightly as well as the corners of the legs. I did not bother staining the legs although I am sure it would look good to do so. I just thought they looked pretty decent as is.
All taped off and ready for a second coat.
Taking painting tape off is one of my favorite parts. I love to see the clean edges! I use frog tape and it works so much better then the blue stuff. It is definitely worth the extra buck.
Sunday, May 27, 2012
Before-Sewing Cabinet #1
My Grandma gave me this sewing cabinet a couple years ago. It is the same sewing cabinet and machine that my mom learned to sew with. The machine is a solid metal Kenmore and it still works like a charm. My Grandma even saved the original manual and feet attachments. I use it all the time and absolutely love having a sewing machine. The cabinet, however, needed some work. I have it mostly done I just need to find a new knob for the front. I will post an after picture once it is all put back together.
Saturday, May 26, 2012
B & A-Wood Chairs
My Grandma was about to donate these beauties but decided to give me a call first. I am glad she did because I love the design and we only had two chairs with our table. Anytime we had people over to eat we were confined to the couch. So four matching chairs sounded like the perfect project for me. I sold our table and chair set and got to work on these right away.
Sanding them was quite the task and required a lot of elbow grease. There are four in the set and they were pretty weather worn in some areas, as you can see in the pictures. Two of them were split right down the middle but Tyler was able to use Titebond III wood glue along with some bar clamps to fix them right up. I just finished them and I love how they turned out so I will post an after picture once I get some cushions on them.
Pardon our mess. I have a one track mind when working on a project.
And After:
I used a stain called Sunbleached. I wanted the chairs to be light gray and look a little weathered. They are more gray in real life then they look in the pictures.
Monday, May 21, 2012
Summer Project List
Finish staining chairs
Get a dining room table
Paint/stain table, stencil
Paint small bookshelf/bench
Paint both sewing cabinets
Stain/stencil tv stand
We'll start there.
Get a dining room table
Paint/stain table, stencil
Paint small bookshelf/bench
Paint both sewing cabinets
Stain/stencil tv stand
We'll start there.
Subscribe to:
Comments (Atom)


